Behind the Scenes: Retired Unit in 3D
My name is Carlos Sosa, I’m a 3D artist from Quito, Ecuador. I’m 36 years old and I’m the Multimedia Director at the Metropolitan Institute of Design in Quito. I’m also one of the 3D instructors at the Institute. We are the first education institution in Ecuador to use Blender as our weapon of choice for 3D art, animation and video games. I’m interested in digital art in general and also in education.
I’m a self taught 3D artist. I graduated from Social Communication in college but I always had an interest in visual arts. I started working on video productions and that led me closer to animation and later 3D. I learned 3D at a small animation studio in Porto Alegre, Brazil but mostly I’ve learned through tutorials and lots and lots of practice. I don’t have a background in any traditional art form, so when I started with 3D I realized the necessity of improving my drawing and painting skills. In my free time I try to practice digital painting and learn more about anatomy and that has improved the quality of my work in the past few years.
I love robots, cyborgs, mecha, and I enjoy a lot modelling hard surfaces. I’ve had the idea of making some kind of robot/monk for a while. I’m a big science fiction fan so my work is mostly robots, creatures and post apocalyptic stuff.
Inspiration
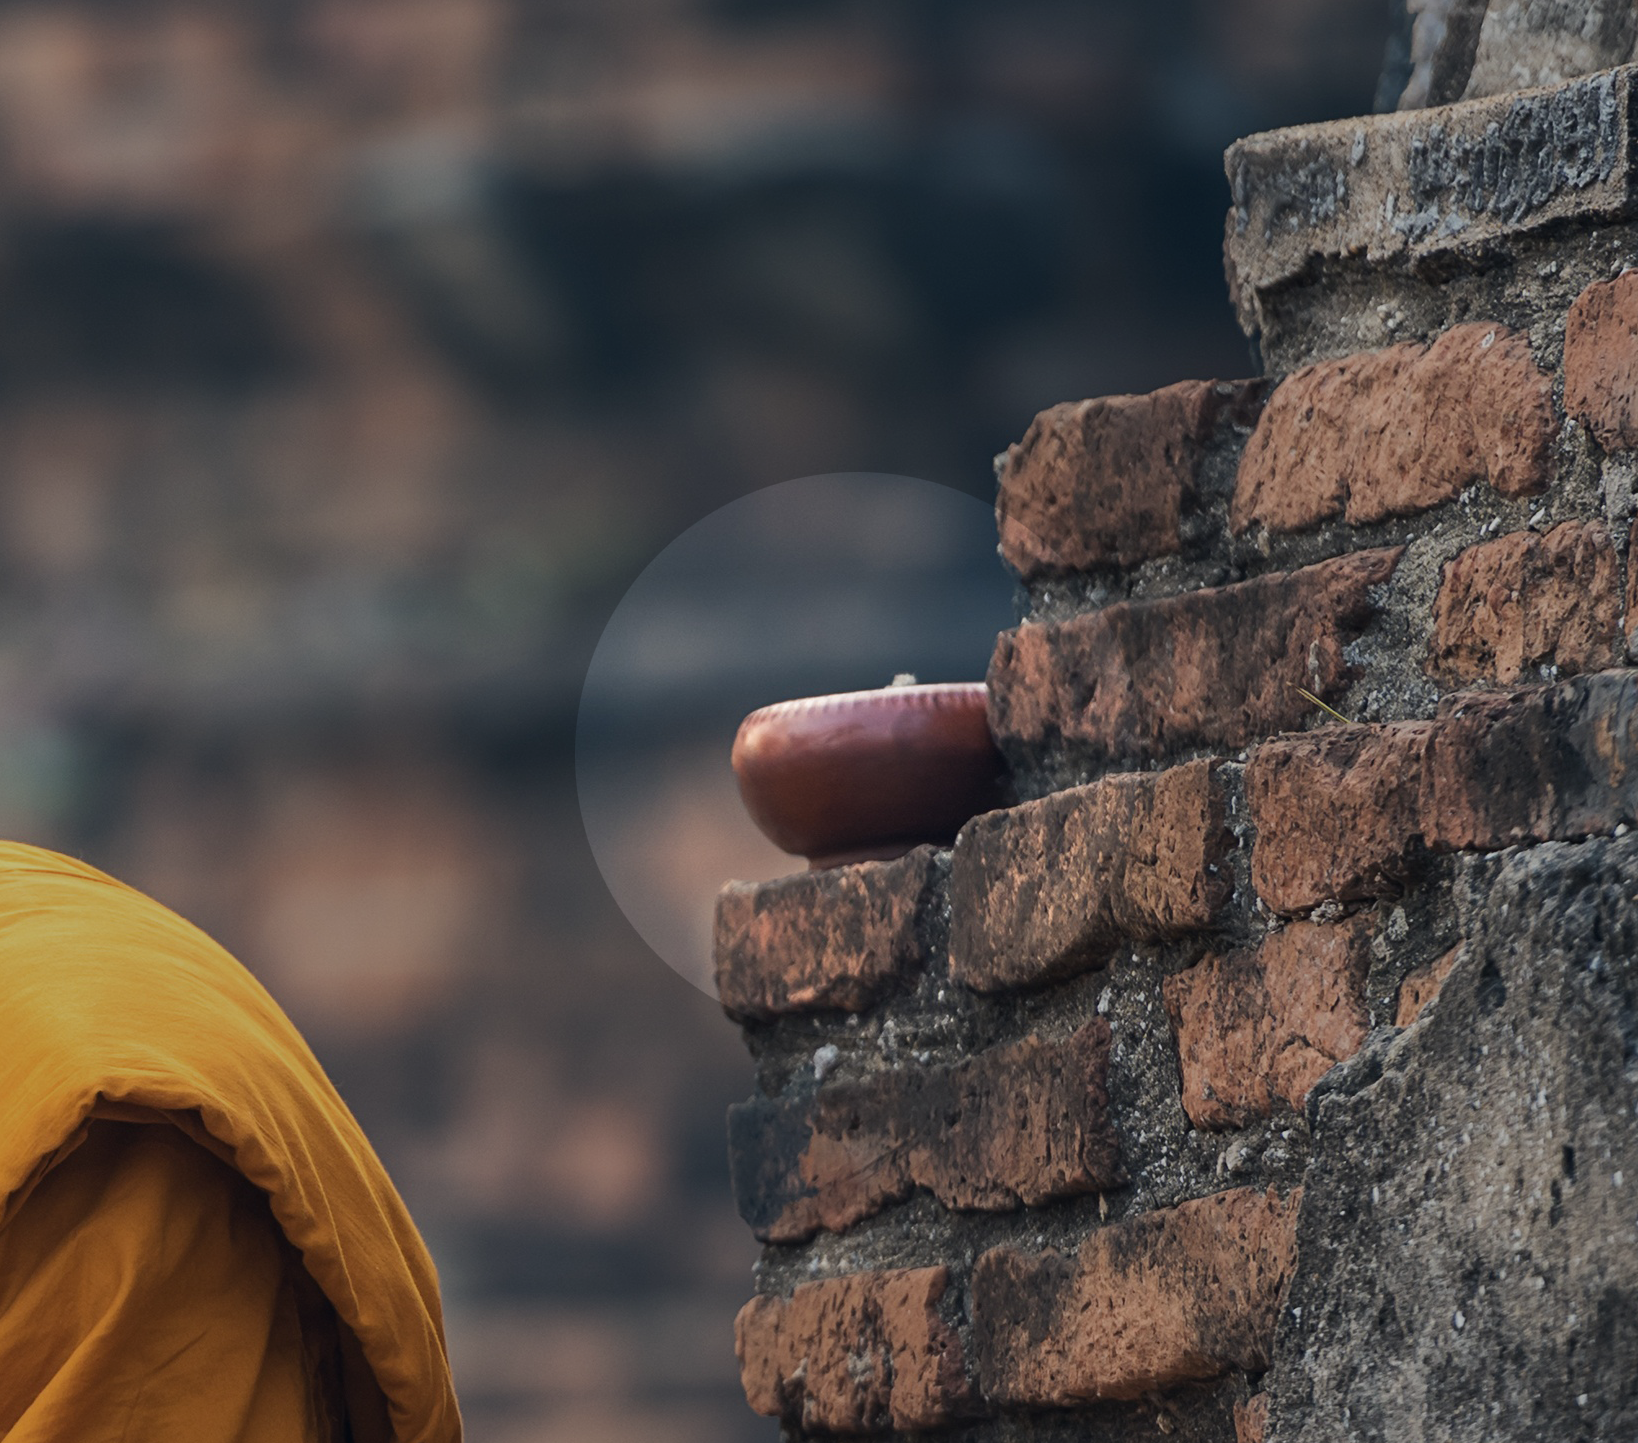
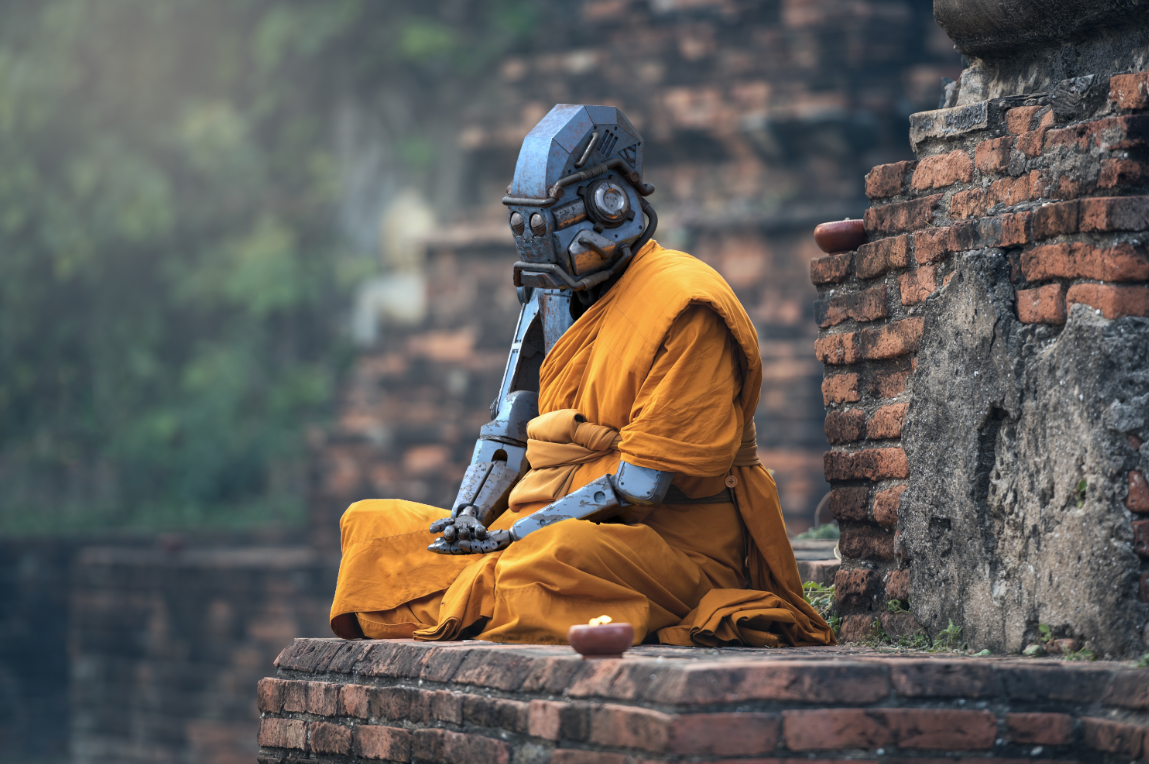
I’m a big fan of the work of Furio Tedeschi and Anthony Jones and I like how they sometimes use photobashing techniques to mix 3D renders with a real photograph. I’m also a big fan of the work of Goro Fujita who sometimes in his illustrations mixes robots with everyday situations. I started looking for some photographs and ideas and I found a beautiful render of a monk meditating. The first time I saw the picture I thought it would be cool to make a robot unit meditating — maybe a unit that has retired from war or from what is was created for. Credits to Sasint on Pixabay for the wonderful photograph.
The Tools
Whenever I have an idea and I want to start working on it, I always start by doing some sculpting and getting some basic shapes and proportions. When sculpting, it is very important to work on your primary forms first. Once your main shapes are secure, then you can start working on the details. Blender has some amazing sculpting tools but in this project I used Zbrush to define my idea. Once the rough idea was finished then I exported the model as an .OBJ to Blender.

Basic Shapes done using Zbrush
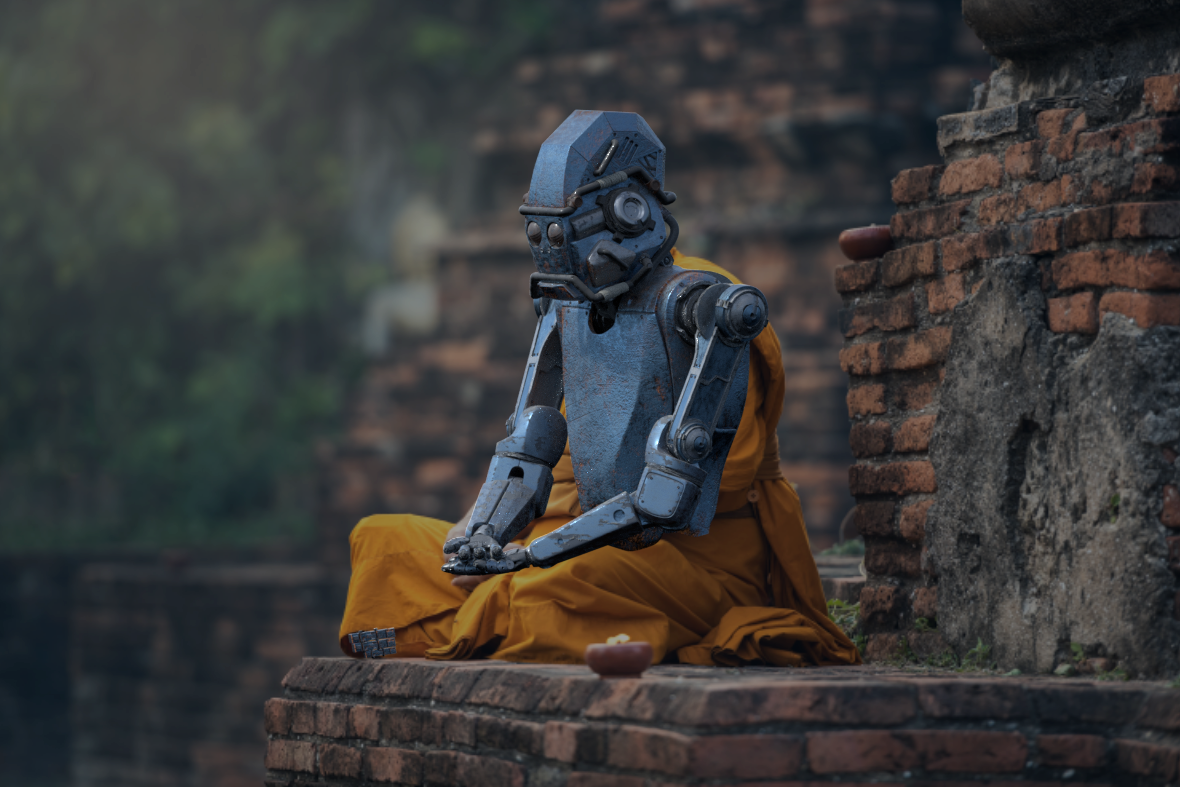
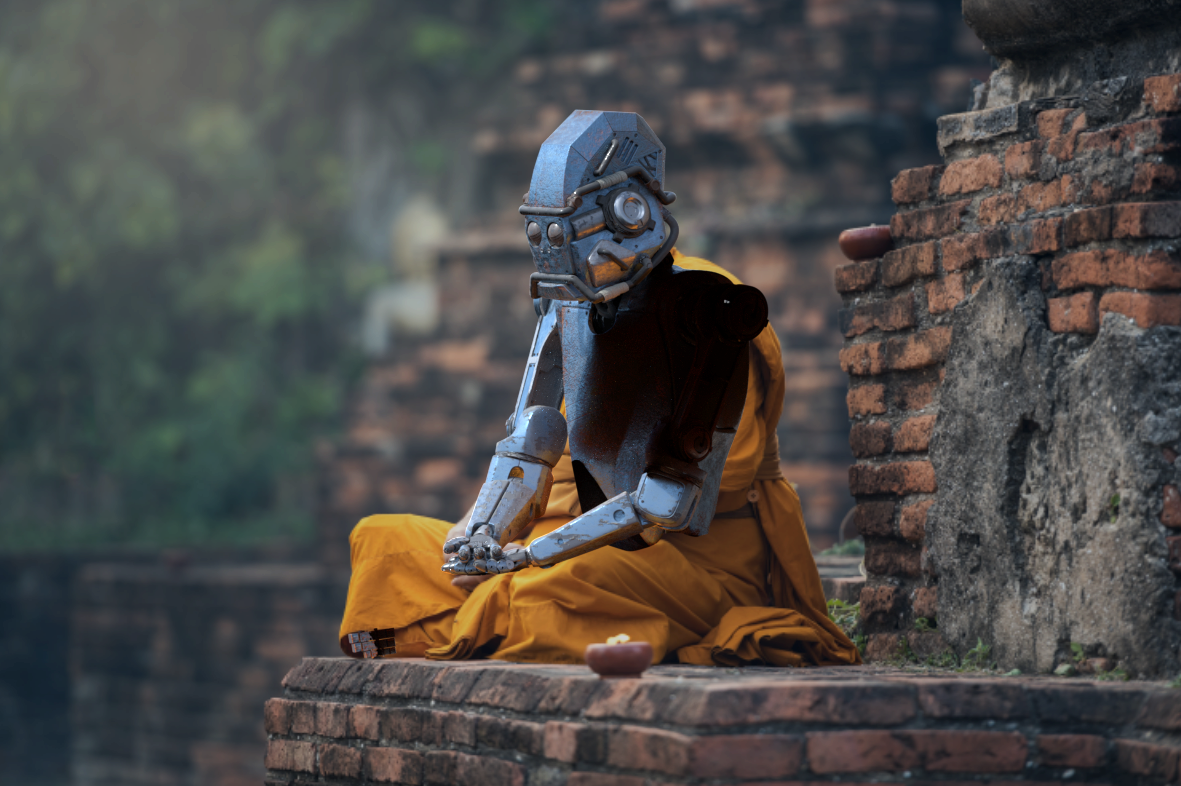
In Blender I started retopologizing the model. For all my hard surfaces models I use the Hard Ops add-on. Hard ops is a time saver and has some amazing and fun to use tools. I didn’t want to spend much time texturing the model so I just used Mike Pan’s amazing Painted Metal Shader for Cycles. The final compositing was done in Photoshop. I’m going to focus on the compositing process of this piece so here it goes.
The most important thing when photobashing a 3D render is to make it as realistic as possible. The model should have the same lighting as the photo and also mimic the reflections of the surrounding environment and elements.
Matching the camera
One of the most important steps when integrating a 3D render with a photograph is matching the camera. First you need to find out the focal length of the camera of the photograph and match it to the 3D camera inside Blender. The great thing about pixabay is that the photographs come with the technical information that we are looking for.
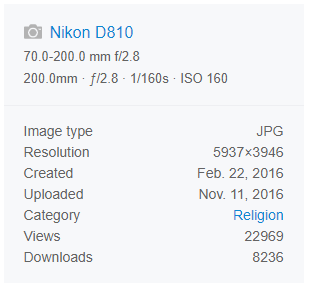
These are the settings for the camera.
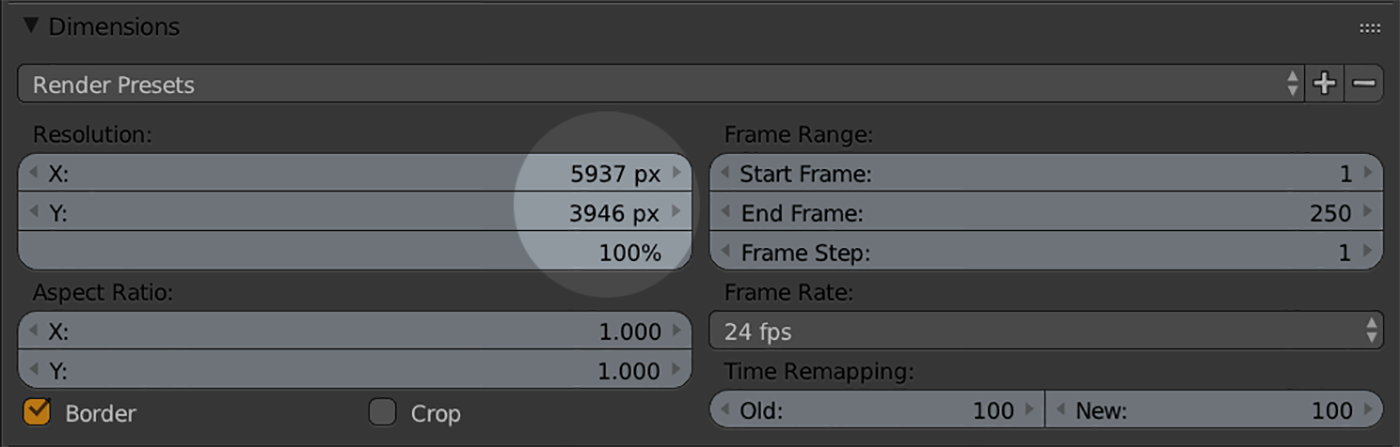
Now we need to match these same settings in Blender. First let’s match the resolution for our project 5937 X 3946. If we don’t want the render to be that big, we can decrease the percentage of the resolution to a lower value.
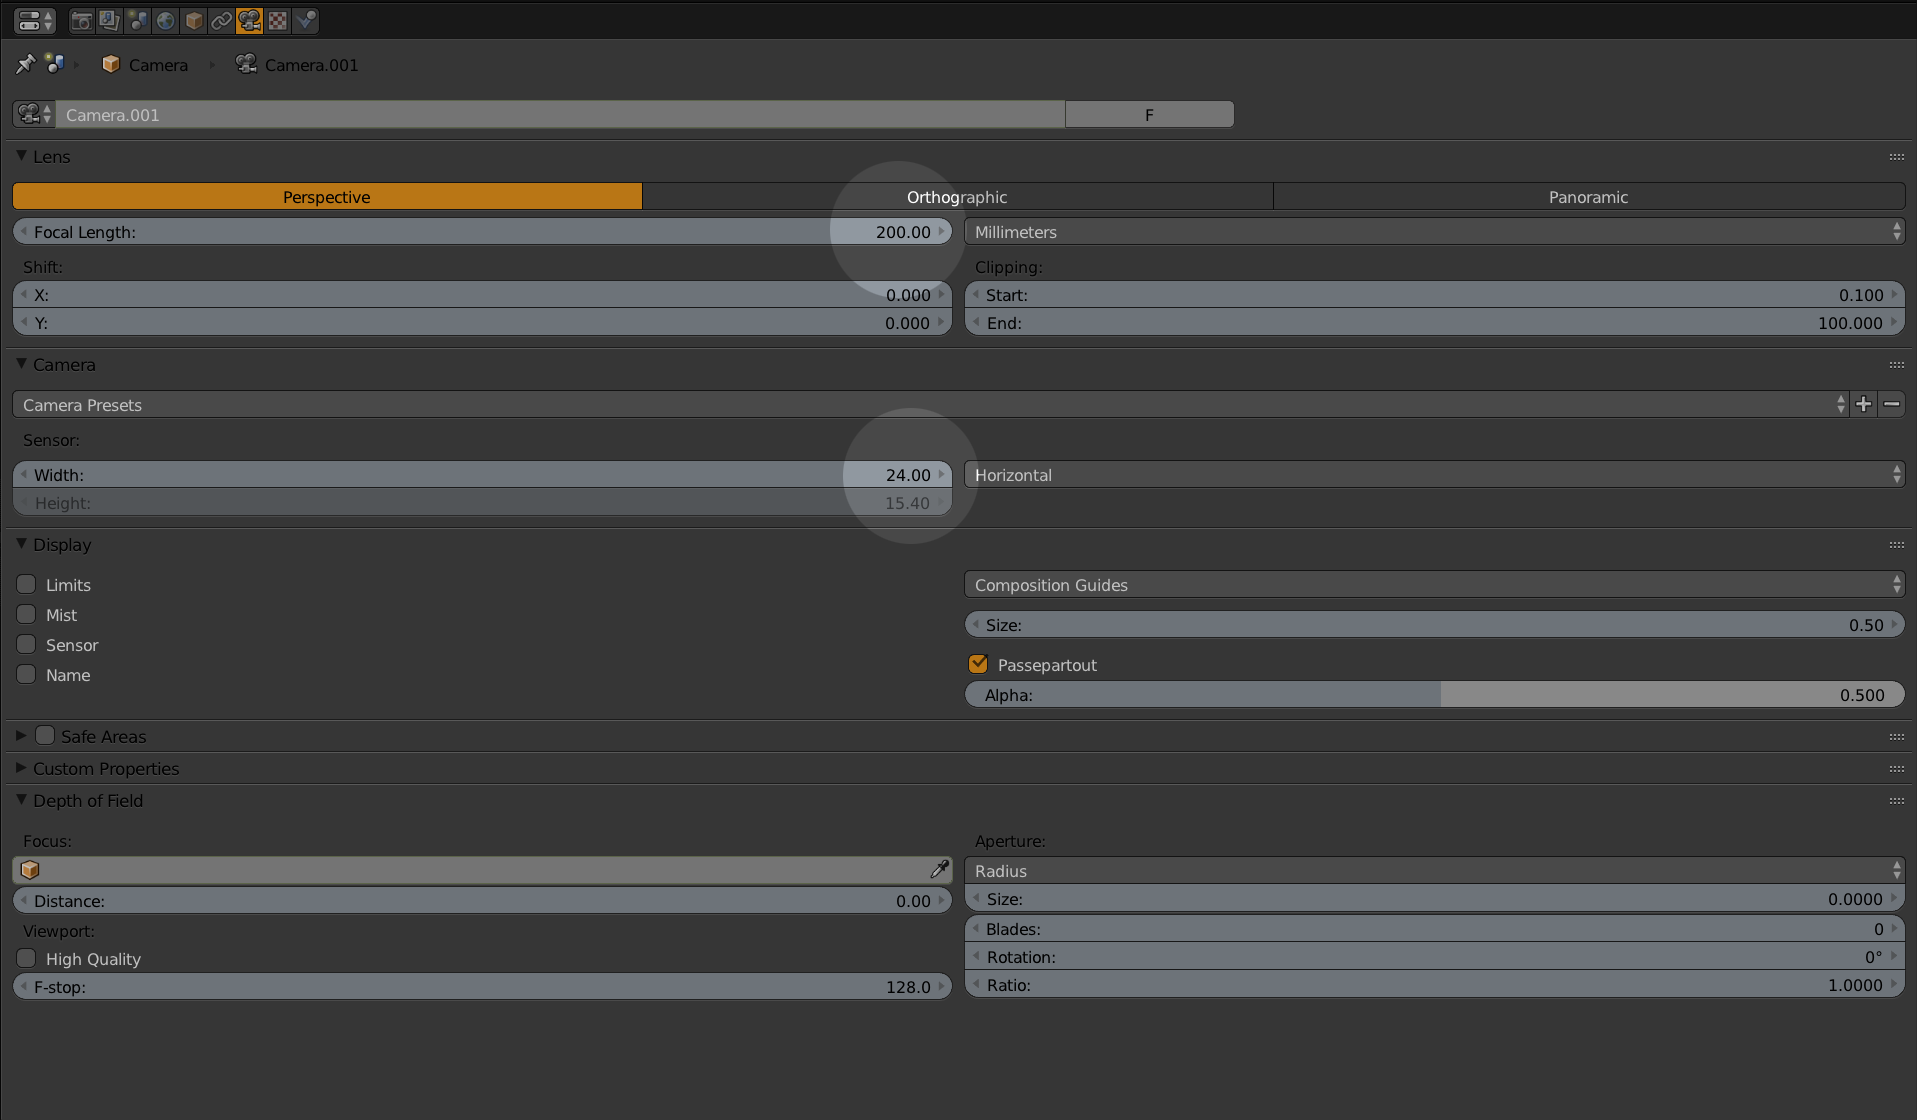
Secondly we should adjust the camera settings. The photo was taken with a Nikon D810 with a 200mm lens. We are going to input those two values in our camera values. The Nikon D810 is not on the camera presets that come with Blender, so I had to google to find out its sensor size. It’s 24.
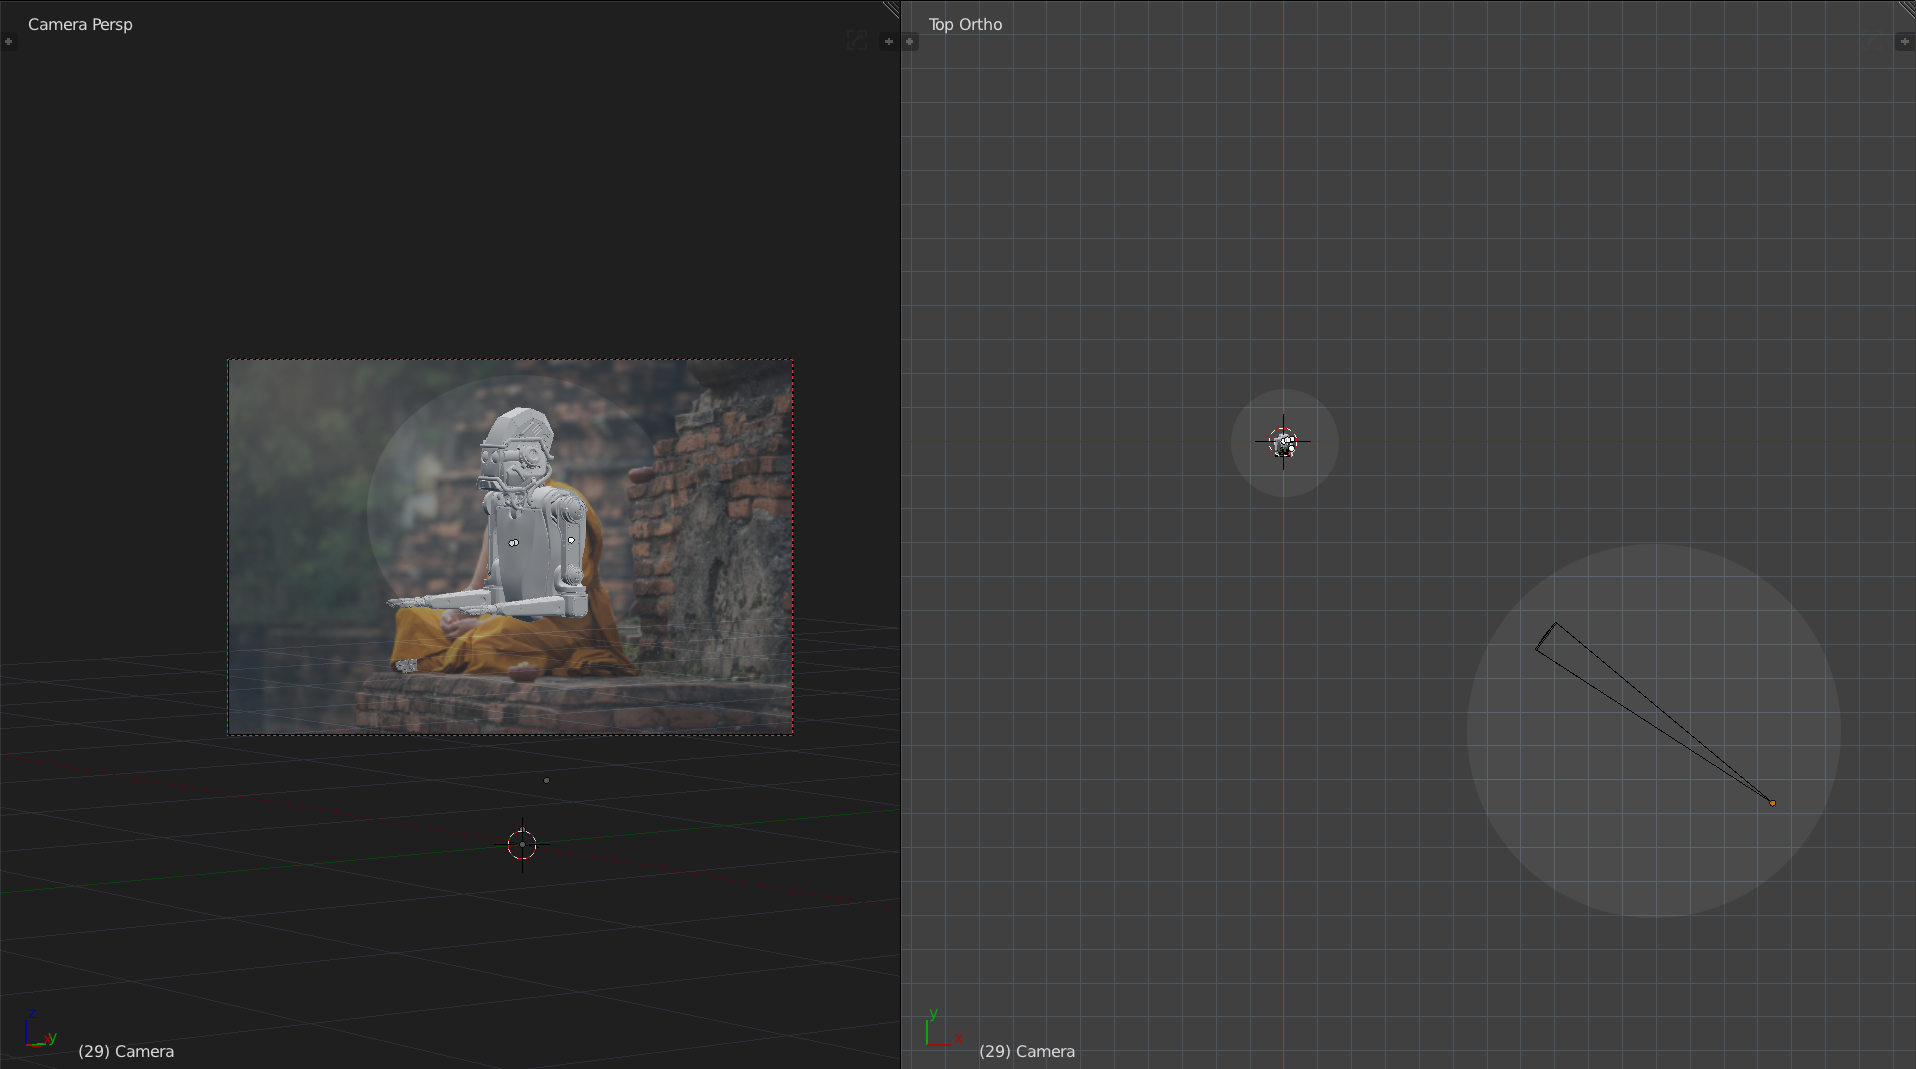
The third step is to upload the photo to Blender’s camera so we can start matching the angle. We do this at the end of the properties panel (N) on the background images option. We need to upload the photograph only to the camera view.

The final step of matching the camera is adjusting its angle so that it resembles the angle of the photograph.
Once all these steps are done, it’s time to dive into the lighting and render steps. To start we need to match the lighting of the photograph to our 3D scene. We should take a closer look at the photograph to find out where the main light source is coming from. The projected shadows on the photograph are also a big indication on where lighting is coming from. In this case the sun light is coming almost in a frontal position to the monk at a 45 degree angle. The candle on the back of the monk even shows us that it was taken on a partially cloudy day.
For the lighting I used Blender Guru’s Pro Lighting Skies but you could use any HDRI sky image that you want. The important thing is to find a sky that resembles the colors of the photograph. Then we should rotate it to match the direction. Here is a first look at the model with the illumination. The model also has a pretty simple rig so I can pose it any way I want.
Lighting and materials are looking good but we are missing a very important part to make the lighting even more believable. The robot should have the same reflections of the brick wall the monk is sitting on and, most importantly, it should have the reflections of the orange robe. To fix this I quickly modeled a robe just to get the reflections and shadows I needed for some parts of the robot. The rest I can fix when the compositing stage comes.

With the robe, brick wall and floor we can get more realistic reflections and shadows on the model. Of course we don’t want to see them in our render so we just need to turn off their visibility for the camera but keep the shadows and reflections working. We do this on the cycles settings located in the object properties. We need to uncheck the camera visibility for the objects we don’t want to see.

These would shows us our model with the right reflections and some shadows that are going to help us blend it better with the photograph when we go to Photoshop. Take a look at the reflected orange color in some parts of the model that weren’t there before.
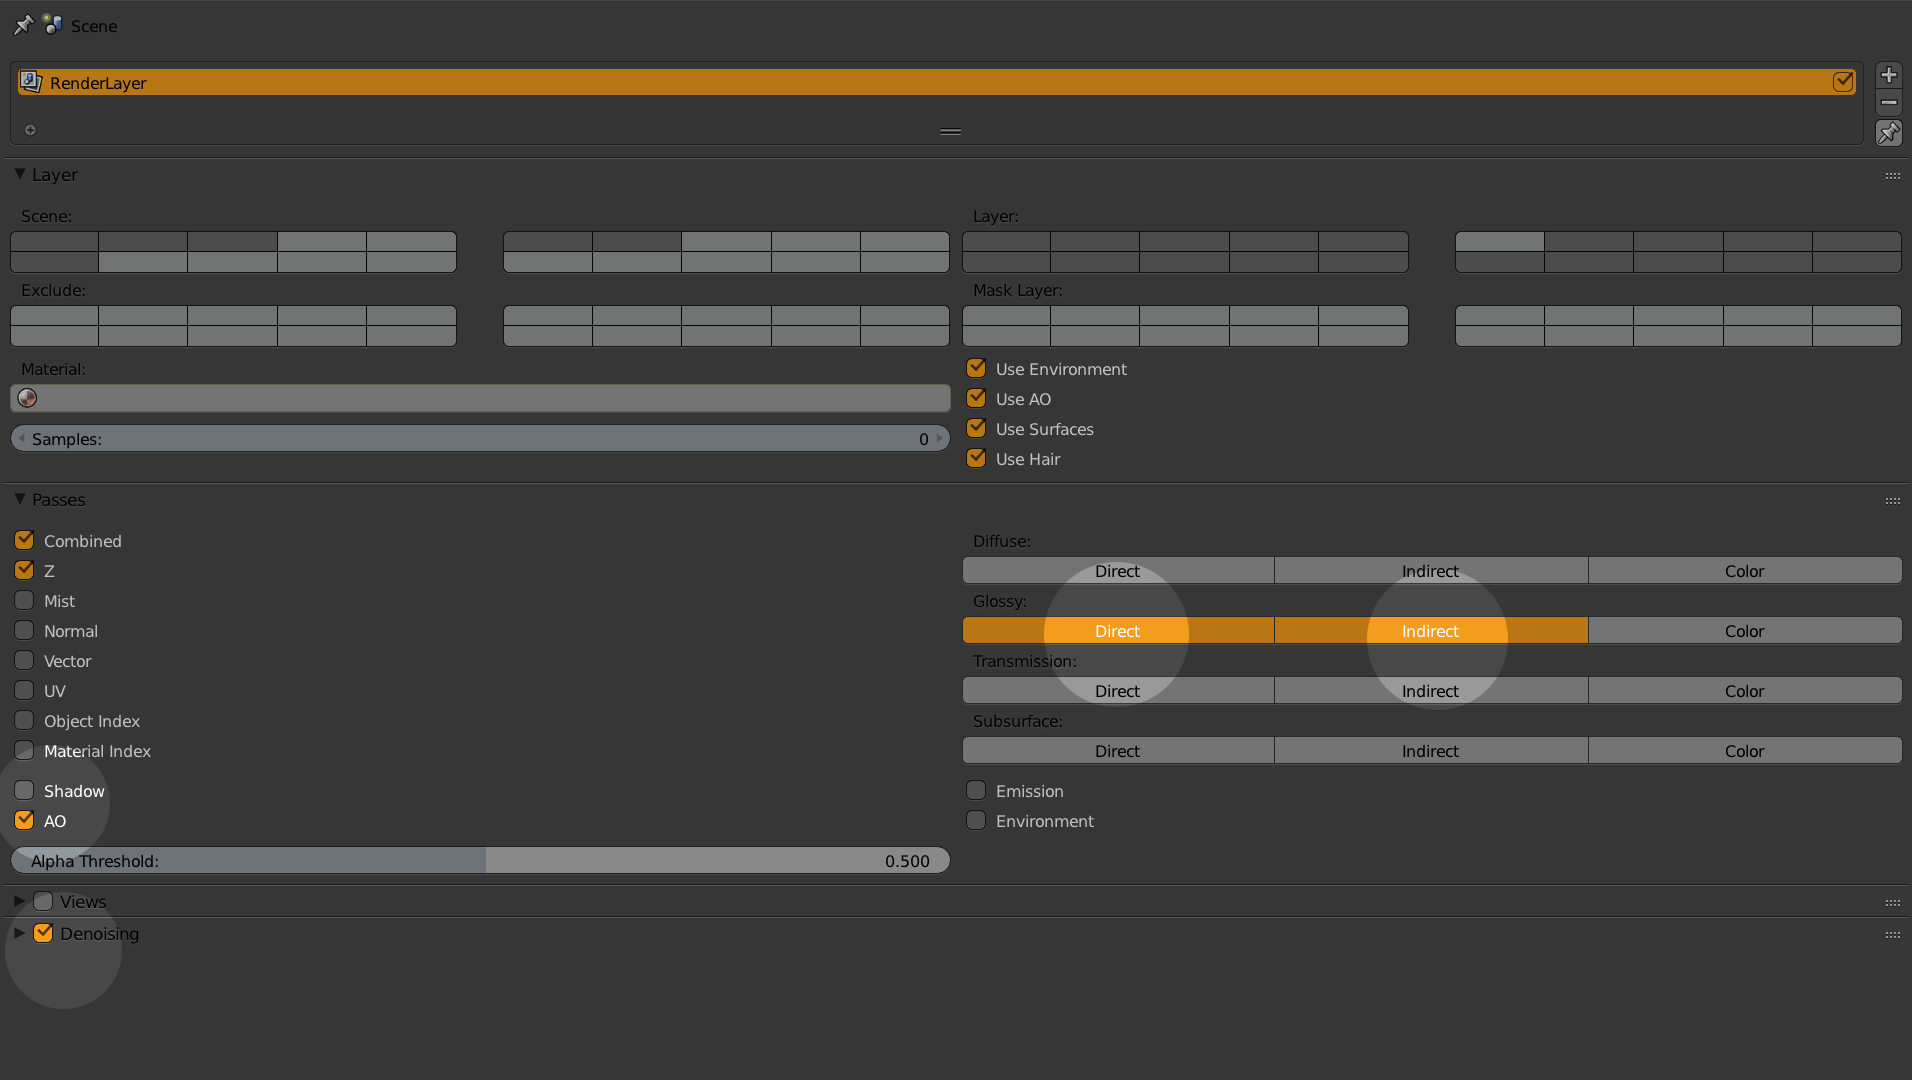
Now it’s finally time to render. I’m rendering at the original size of the image, that is 5937 x 3946. It’s pretty big but the more pixels we have to work with in Photoshop, the better. I’m also taking some render passes to composite. The most important one is the Ambient Occlusion pass which will add more realism to the shadows. I’m also taking the glossy direct and indirect to improve some of the reflections. And of course don’t forget to turn on the magical denoising filter for cycles. I render the project at 400 samples.
Ok, time to make a quick overview of the compositing process. It’s a very straight forward process. It’s all about making masks in Photoshop, cutting pieces, and filling parts that weren’t there on the photograph using the clone stamp tool. Here is how I work with the mask for putting the robe on top of the robot.


After the piece is starting to come together it’s time to drop in our render passes to give it more realism. I’ll start with the ambient occlusion, putting it on multiply mode so all the shadows pass to the model. It makes a huge impact on the image.
Later I will add the Reflect Direct and Indirect Pass to improve the reflections.It will make all the metal details pop.

The last step is to add some contact shadows that are making some parts look like floating. For this I just use a simple brush and manually paint the shadows on multiply mode. The shadow on the crossed hands projected on the robe was very tricky. I actually had to go back to Blender and take the shadow pass out of the robe so I could mix it in Photoshop. This is the final result.
