Environment Production: Oni Shrine Breakdown
Jeryce Dianingana did a breakdown of his stunning Oni Shrine environment made in Unity which won him the 3rd place in the Game Environment section of ArtStation’s Feudal Japan Challenge. The artist talked about crafting a large rock scene, lighting, atmosphere tricks, shared some useful materials and pieces of advice for the artists who’d like to participate in the next challenge.

Recent Updates
Hi! The most recent thing that happened to me is that I moved to Montreal 6 months ago after Quebec, a beautiful city. I also went to the MIGS (Montreal International Game Summit) a few weeks ago, and it was my first convention as a professional artist. I met a lot of inspiring people there!
Oni Shrine: Project Goals
The idea behind the Oni Shrine was to put everything that I learned recently into one project. By everything I mean the lighting, sculpting, and textures.
I did the AfterGlow scenes a few months ago to learn different interesting ways to play with the lights, and especially the composition because I studied a lot of movies and pretty clever ways to highlight your elements in the scene. I will explain this at the end!
In terms of sculpting, I wanted to know what I could achieve in a personal project. I spent more than a year sculpting rocks on Assassin’s Creed: Odyssey with Tangi Bodio‘s help. This artist is really talented, I learn a lot while working with him with ZBrush and stylized renders. Go check his ArtStation!
As for the textures, while working with Pierre Fleau, Vincent Derozier and Jonathan Benainous, I learned things that I never imagined in Substance Designer and Painter. You should definitely check the Substance Workflow at Ubisoft Québec video below:
Inspiration
I came up with this concept very quickly, because I knew exactly what I wanted to do in terms of modeling, lighting, and mood. There is a question that I always ask myself when starting a big project: what would I like to see in a game or a movie?
I was very inspired by the Art Blast of God of War which kind of changed my life. The textures and especially the compositions of the scenes, their epicness, huge panoramas, the scale of some environments – that’s exactly what I love in the games. There are also other games that like to play with the scale, for example, Uncharted: lost legacy or Shadow of the Colossus.
I really took this challenge personally and wanted to know whether the changes in life were worth it or if I left my family and friends in France for nothing. I needed to know that I improved my skills.


First Steps
The first step was to decide what kind of mood I wanted to share with the viewer. The intention and the things that I want the viewer to feel is really important for me. In order to find the most efficient way to create my assets, I wrote a plan and the exact pipeline for each asset. I didn’t want to try new things and take risks in experimentation but to apply what I’ve learned this year.
With the help of PureRef, I created 3 sets of references images, lighting, the houses, and the global intention. References came from movies, anime, comics, manga, and games, of course!
Why Did You Choose Unity?
I learned Unity 7 years ago when I was at school. A lot of people asked me why not choosing Unreal, but at that time I wanted to prove that you can’t always depend on the engine but on the artist, too, and that with time and dedication you can compete with a project made in Unreal or CryEngine.
Of course, I like Unreal but I have a little crush on Unity. I feel very comfortable with it and easily make what I want without being frustrated. I find it very user-friendly: they are not so many parameters that you need to change when opening, just 2-3 things and you can go, so If I have a choice I will stay with the engine that I’m used to. Also, people from the Unity community are very kind to me and give a lot of support!
Scale
You can see the comparison with a 6″1′ character here:

Rocky Walls Production
Rocks
This step was one of the most enjoyable things, and the real challenge was to stop building more rocks and having a very noisy scene.
I already knew that I wanted to reuse a lot of assets so I built and textured them in a modular way. I love realistic renders but not with too much information/noises, so the sculpt of the rock is focused on the shape. Generally, I don’t put many micro-details directly in ZBrush.
To avoid some issues with aliasing and sharp edges I always Inflate them a little bit in ZBrush. It gives them a subtle stylized effect which I like.

I’m using a basic shader with an extra tileable texture created in Substance Designer that I tile in the UV2 of the rock. I can easily reduce or raise the amount of noise in the scene. The goal was to make the scene smooth and easy to read.


Constructions
I mainly use the UBER – Standard Shader Ultra by Tomasz Stobierski just to blend 2 material together with the vertex painting that I paint with the PolyBrush tool.
In Substance Designer, I made all the textures that I needed for the houses: 2 tileable wood, one clean and the other one damaged that I blended together with the vertex color based on the height.
After this, I created 2 trim textures. One was for the ornaments: I made the shapes in 3ds Max and extracted the Height maps for Substance directly in ZBrush via the GrabDoc feature.


The other trim was for the roof, here I just used Substance Designer.


I tried to minimize the baking pipeline to be able to quickly create an ensemble of assets with the trim. Time is very important when you have a strict deadline like in this challenge, especially when you’re working along the way.
I didn’t really need to spend much time on the micro-details because of the distance. I made sure not to make very close shots around the houses.


Lighting
This step was definitely the hardest part of the scene. My goal was to make it mystical, scary but at the same time attractive. I also tried to reach the lighting like in Uncharted, especially the “Lost Legacy”. Congratulations to the Naughty Dog team for the result achieved!

I have 3 type of light that I baked with the progressive lightmapper:
- The “Moon” light, the directional one.
- The “Fill” one, bright and a little bit pink to slightly illuminate the dark space and to highlight some interesting points like the Oni face.
- The “Cave” Lights, reddish ones to make the cave breathe like there is something mystical behind the rocks.
I had a big problem with the lighting, The unlit spots of the scene were too black and that made the scene not really enjoyable to read. The Oni face which is the main focus of this scene was only visible in Full Screen while the viewers needed to be able to see this element in every size. This is where the Fill Lights were very useful.
The lights were also too saturated before and were eating some information.
Volumetric was a big part in this project: I used a plugin called AURA by Raphael Ernaelsten, a very talented Technical artist. It helped me a lot.
With it, I put the Lights particles around the lanterns.
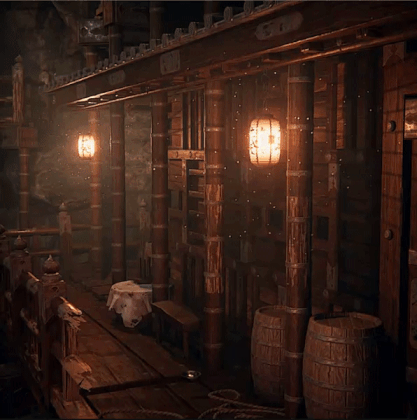
Injection Volumes allow you to control the density of the fog in 6 different volumes: Global, Planar, Box, Sphere, Cylinder, and Cone. I placed a Cylinder one with a red/pink color at the top of the cave near the blood moon.


Stepping aside, I want to mention that Raphael is working on the second version of this asset with a lot of interesting features like Real-Time Volumetric Global Illumination:
Tricks For Atmosphere
Fog/volumetric light is the best to achieve a special atmosphere, but there are more important things such as video presentation and music. As environment artists, we have an advantage in presentation, so I always try to make a video.
Like I said previously, in my AfterGlow scenes and other experiments I tried to learn a lot from other media like movies, anime, and comics. And I fell into what Scott McCloud called Aspect-To-Aspect transition. Scott is the author of a graphic novel called Understanding Comics. He studied six types of sequence transition in this book and the one that I love is the Aspect-To-Aspect. This technique is very popular in Japanese Mangas or Animations like Your Name or pretty every work by Makoto Shinkai. Ghost in the Shell intro was the most beautiful thing I had seen when I was younger.
“It effectively freezes time to establish a mood, feeling or emotion of a scene. Think of this transition as “the wandering eye”, looking around and taking quick snaps to understand what’s going on”.
Advice
When you’re participating in a challenge like this, don’t be shy to create your own scene. It’s a hard competition and there are going to be people more experienced than you, but every artist is unique. Try to find what you like, what reflects you, and put it into your scene like it’s a part of you!
Another piece of advice: ask your colleagues, friends or family about your scene. There are some things you rarely pay attention to, and other people will help you with it by directly saying what they don’t understand or don’t like.
Find ready to download architecture 3D models on Flatpyramid.