Crafting a Stylized PBR Dagger
Cordell Felix gave a talk on how he sculpted and hand-painted a stylized PBR Dagger in ZBrush and Substance Painter.
Introduction
Hey everyone, my name is Cordell Felix. I was born and grew up in Orange County, California. I’ve worked on titles like God of War 4, Battlefield, Bioshock, and a few other indie titles. I’m currently a Lead 3D Environment Artist at Nexon OC in Irvine, California.
I’ve been working in the game industry for 7 years now. I got into game development because I was looking for a way to merge both video games, and art. I grew up playing games, drawing, and painting, so game development was a perfect career choice for me. During my last semester at art college in 2011, I got a job working on a Coca-Cola commercial and mobile game. Since then, I haven’t stopped pushing myself to improve.
Here is a snippet of some of my other work:
Stylized PBR Dagger Project: Concept
First off, shout out to my buddy Lonnie Harrison who designed the dagger. I was flipping through his sketchbook a few years ago and saw this dagger sketch and wanted to make it. He happily let me.
Challenges
I challenged myself to make a stylized weapon because I have been making mostly realistic 3D art since I’ve been working in the game industry. Stylized assets were always out of my skill range, so I wanted to get better at stylized art. Some of the big challenges for me on this dagger were exaggerating shapes, pushing color and light, hand-painting instead of using realistic textures, and being hard on myself to figure out why something looked bad to learn from and be better at.
Hand-painting was probably the biggest challenge for me. I’ve dug myself into a realism art hole throughout the years. I still have a ton to learn when it comes to being a skilled hand-painter. There are so many different kinds of techniques, but It really just boils down to learning the art fundamentals. If you have a good eye for form, color, value, lighting, and composition then you’ll understand better why something might look off. I’m no expert when it comes to this, as I said, I still have a lot to learn. Also, hand-painting in substance painter is difficult because the viewport won’t let you orient the model however you like. Hand-painting in 3dcoat is much easier because of the viewport model orientation.
Another challenge was learning to take a step back and evaluating the model and checking if it looks stylized enough. There was a point when I finished the sculpt, and wasn’t satisfied even though it matched my friend’s sketch. So I pushed it further until I liked it. Pushing myself and breaking out of my comfort zone was a big challenge when doing stylized. I would bend or curve a part and continue until I felt it was too much and left it.
Stylized vs. Realistic
The reason I started this project was to learn stylized PBR. This to me meant hand-painted textures, stylized shapes, and realistically rendered materials. I learned from working on this that I needed to exaggerate where I could in order to break my traditional realistic techniques. The shapes and textures needed to be pushed as much as possible, because I was going to throw realistic materials and lighting on it for the end product. Small details are part of a realistic workflow, and I had to teach myself to work simple and go for the broad strokes instead of focusing on the small details. It’s like a painting, start with the broad strokes first, then get into the smaller details. For stylized stuff, you don’t really need to do the smaller details. However, I did add some nice surface detail and small scratches on the wood.
Modeling
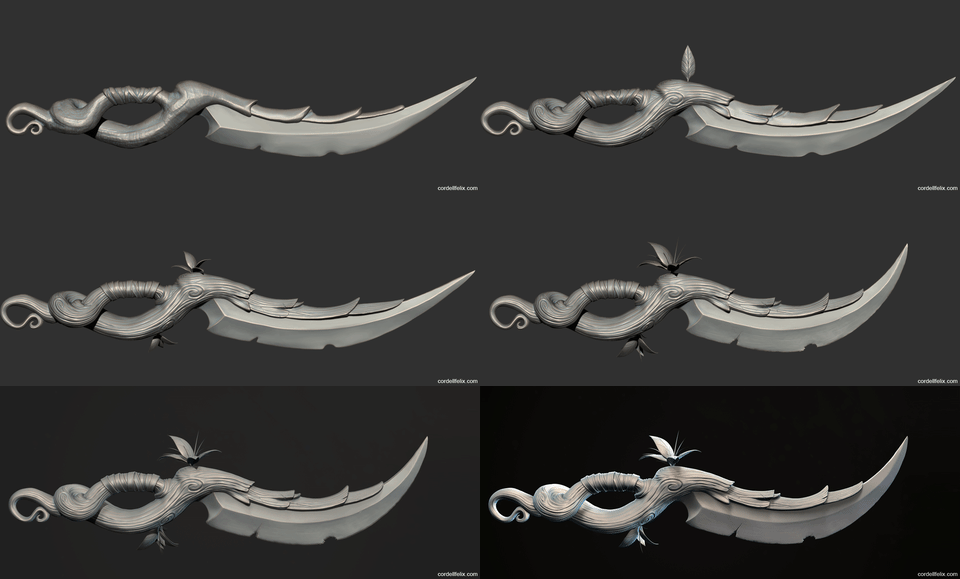
One other reason I created this dagger was to make a sculpt 100% inside of ZBrush, no blockout in a 3D application. I also wanted to hand-paint this in Substance Painter instead of 3D-Coat. I sculpted this dagger 3 years ago, there’s a lot I would change about the sculpt now because I’ve learned a lot since then… but that’s a different story altogether. I recently finished the textures because I wanted to revive the dead WIP and move on. I don’t usually recommend reviving dead WIP’s to people, it’s always best to just move on. For some reason, this project wouldn’t get out of my head.
I started the dagger in ZBrush with shadowbox first, this wasn’t necessary, but I wanted to learn how to use Shadowbox for fun. If I did this again, I would’ve just started with a dynameshed box or sphere and then shape it. Soon after getting the shapes done in Shadowbox, I converted them to dynamesh and started to sculpt with clay tubes to blockout the shapes on the wood handle and leather straps.
Sculpting the Wood
Most of the sculpting was done with just a few brushes. Generally, after blockout, I’ll use clay tubes to sculpt the forms, then smooth them out get a better result. Work dirty and blockout the shapes to get all forms onto the model. This workflow keeps the process fast.
Michael Vincente’s fantastic ‘Orb_Cracks’ brush is great for ANY type of stylized crack. Trim Dynamic brush will help with most surfaces to flatten them down a bit (Flatten, hpolish are fine too). I like to use a square alpha with Trim Dynamic. The ‘Dam Standard’ brush is great for sculpting leaves, it has a natural lift on the edges of the cavity for a softer feel. For the cracks, I sketched out the lines with a low intensity first to create the outline, then I would trace on top of them with a large Orb_Cracks brush and lazy mouse.
Sculpting the Blade
Most of the work on the blade was a combination of Trim Dynamic, Flatten, and Orb_Cracks. I beat up the edges of the blade with Trim Dynamic. The Flatten brush helped me polish the flat surfaces of the blade so I could then sculpt the blade surface scratches with Orb_Cracks on a low intensity. I’d also recommend checking out the Orb_Flatten brush or the MAH_edge brush, I’ll use these sometimes if I don’t like the results of the flatten brush.
For the surface detail on the blade, I sculpt a bunch of lines with Orb_Cracks, and tone it down afterward. This technique can apply to a lot of areas on the sculpt as shown on the wood. Go broad, then tone it down after.
Hand-Painting the Blade in Layers
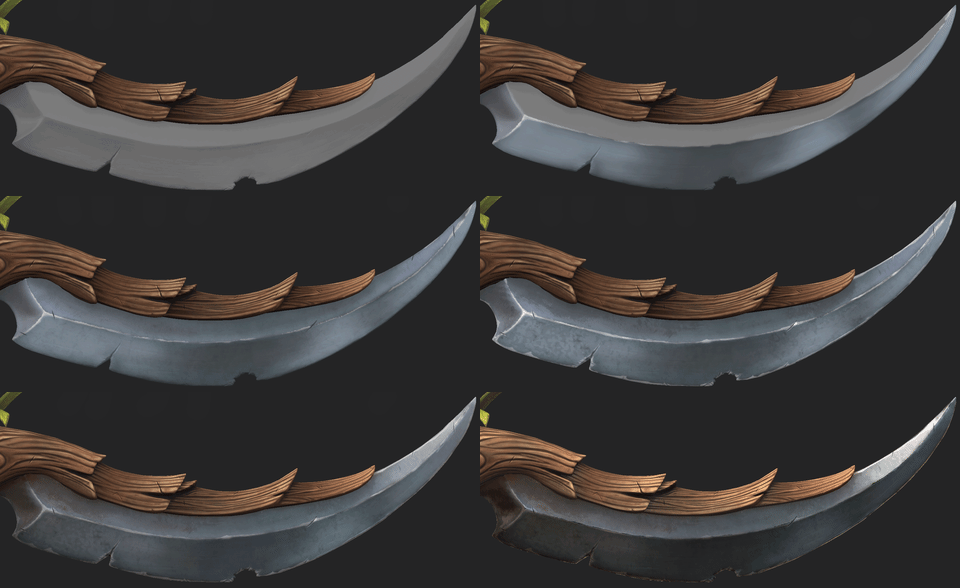
To start the base color of the blade, I blocked in some colors and highlights first in unlit mode. After the color blockout, I painted everything else on its own layer so I could use them as different roughness values afterward, or change the color whenever I needed. In the end, I learned that most of that information I painted was wiped away because of the metalness and cubemap reflections in lit mode.
At first, I tried to achieve the hand-painted look, like WoW. But you can only really achieve that feel with an unlit mode. When you have physically accurate materials, you can’t get the same look. Work in the unlit mode to make sure the colors look good and work in the lit mode to make sure the roughness and metalness look good for the end result.
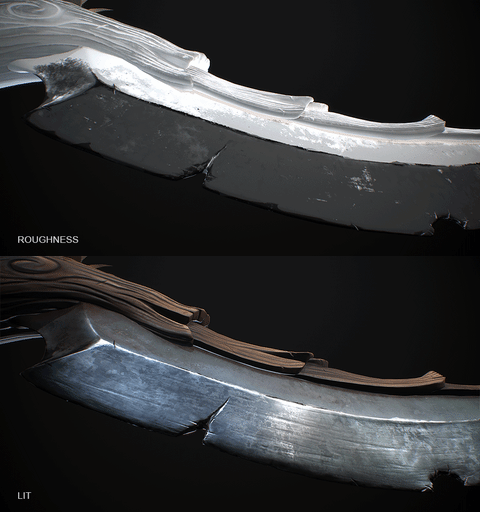
The material of the blade looks fancy mostly because of a good use of surface roughness. I used the edge wear layers I hand-painted and used them as different roughness values. On top of that, I used many types of roughness noise textures and painted them where I wanted interesting surface detail. Some of them use simple generators in Substance Painter using the curvature map.
Leather Grip
The blockout of the grip was pretty nasty. It needed some love so I sculpted a single cylinder piece and duplicated it a bunch of times to make up the wrapped grip.
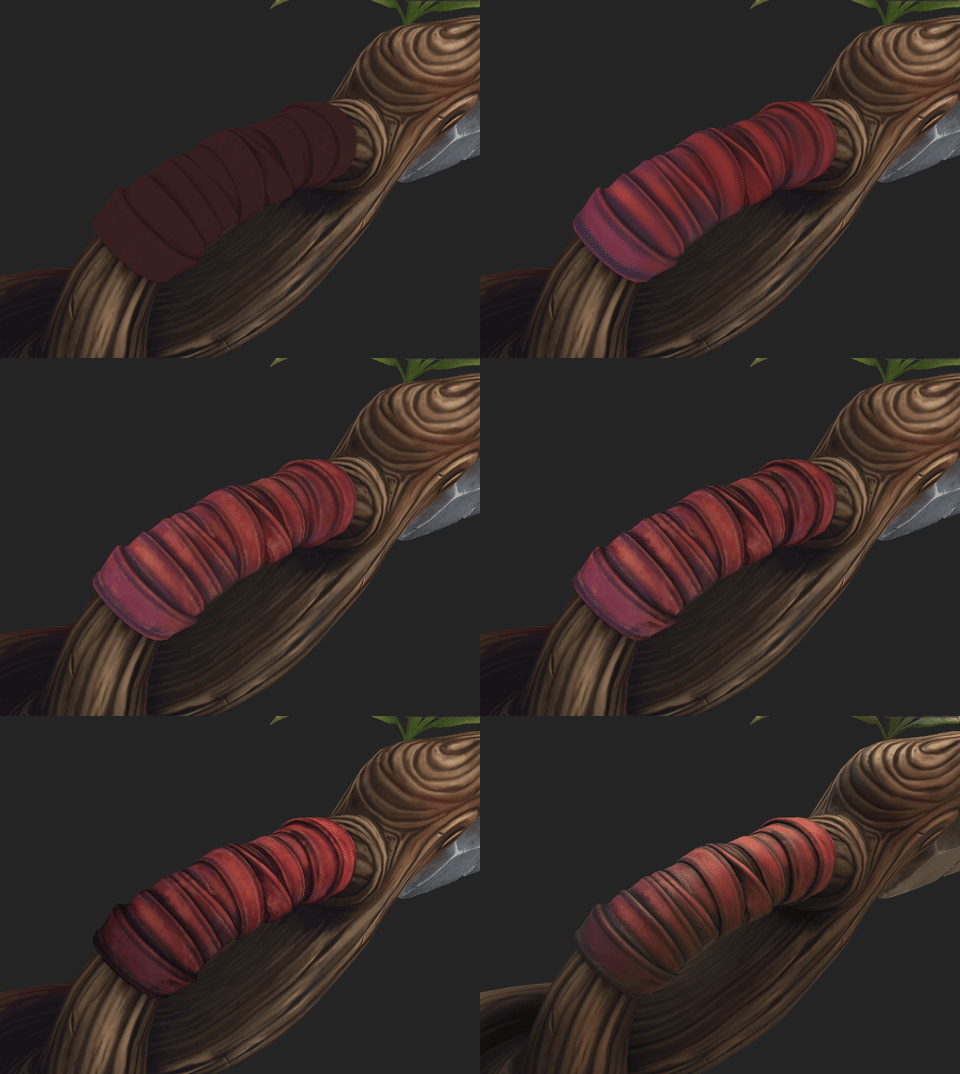
The leather grip is a combination of hand-painted base colors and using the Mask Editor to quickly create edge highlights, grime/dirt, surface variation based on my baked maps (AO, worldspace, position, thickness). I also used a tileable leather height to add some surface detail to the normal map, it helped give the grip some material definition.
The Mask Editor is great to quickly add dirt or edge highlights and use that as a jumping off point to finish the texture. I try not to use the mask editor without editing the alpha afterward, you can get some unwanted results that you can just paint out yourself.
Wood Material
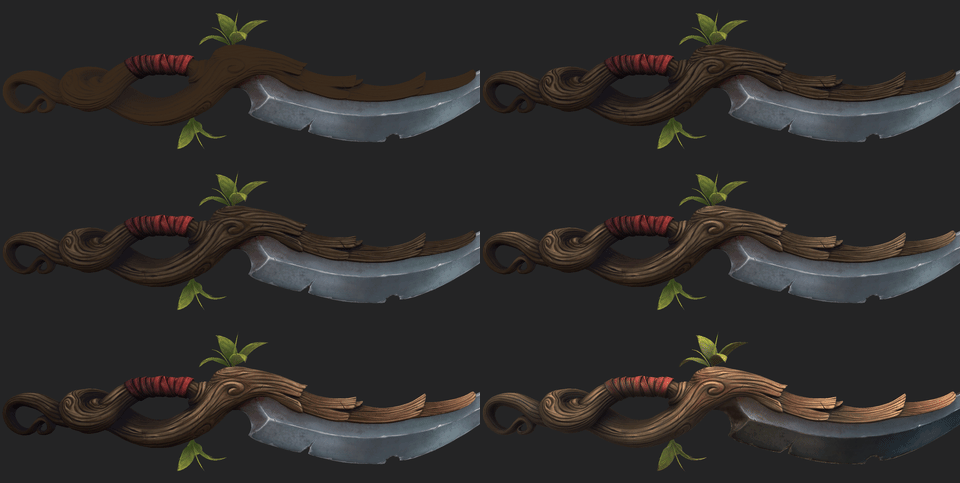
The wood took the longest on this entire project. It’s probably the most important material on here to help sell the idea of the dagger. I thought I could get away by using a couple Mask Editors and generators to finish the texturing of the wood, I was very wrong. Take your time and paint your model if you feel it doesn’t have life. Several attempts were made at painting the wood, I kept painting until it looked good. Highlights and cavity dirt played an important role here, these layers acted as the lighting which was still needed for stylized PBR. The second most important thing was the use of color, the wood was very boring when I first started and was mostly just different hues of brown. I started to add some reds, blues, and even greens in the end. Red was the color I favored the most, I used it mostly on the front of the blade to help draw the eye. To wrap it up, I used another harsh gradient along with some bright highlights on the tips of the wood sections to pull the eye forward.
Gradients
As I was learning hand-painting, I found that gradients are what help sell a model and wrap it up nicely. It’s good to lead the viewer’s eye to the important stuff and let their imagination decide how cool it looks. I purposefully darkened the dagger from back to front and kept going until I felt it was absolutely too dark, then pulled back a bit. I’m forcing the eyes to look at the front of the blade first, and then slowly lead to the back of the blade to see the rest of the model. The first read is very important. You need to catch the viewer’s eye with something cool and let the eye naturally run across the rest of the model.
Global Gradient:
Localized Gradients:
Don’t Give Up
Check out my Artstation blog where I talk about when I decided to pick up the Dagger project after quitting it for almost 3 years.
I abandoned the dagger at the texturing phase. The most important phase, and one of the main reasons I started this. When I got to hand-painting it, it was looking awful, and I didn’t really know how to make it better. I was mostly scared to work on it because I was afraid it was going to look terrible since I didn’t know what I was doing. Sometimes you forget what you have to do in order to move forward. There will always be hurdles on any project, you have to learn how to jump over each one when they come up and not give up. Reference, getting critiques from friends, finding inspiration, coffee, and learning from tutorials mostly help me.
Lessons Learned
- Push it until you break it, then take a small step back and leave it.
- Exaggerate when you can, even if it gets you out of your comfort zone. I still feel like I could have push more shapes on the model, and pushed the texturing further. I’ll save my learnings for my next stylized project and move on.
- If you don’t feel confident about a certain part of your project, find more reference or watch some more tutorials. I did this plenty for the dagger.
- Imperfections in stylized art are a part of the charm, not every stroke has to be perfect.
Here you will find 3D models of melee weapons.


